Showing posts with label Johnny Utah. Show all posts

Thursday, March 12, 2020

Leisenring’s black gnat tying tutorial.


Being that I love wet flies, soft hackles, flymphs, and spiders, I thought why not have a tutorial on tying the black gnat.  The recipe I followed is the one the famous James Leisenring wrote and tied.  With the addition of a thread rib for extra protection. This fly is proven effective time and time again. The fly shows what the famous north country spiders of the u.k. show.  Simplicity for imitation is best.
MATERIALS 
HOOK: Wet fly hook 14-20
THREAD: Claret 
BODY- 2-3 black turkey tail fibers from the top of the tail
HACKLE: purple iridescent starling
RIB: tag end of tying thread. 
 Start the thread and advance down to the point.
Be sure to wax the thread and don’t remove the thread tag. 
This will be the rib. 
This is the section of tail used for the body. 

Tie in the turkey tail by the tip at the back of the fly. 
Bring the thread forward. Leave a hook eye space. 

Wrap the turkey towards you on the way up.
Catch it in, tie it down and cut the excess. 

Wrap the the tag rib the same way you wrap
the thread. 

Select a starling feather. (Purple is green! Depending on the angle)

Strip away the fluff. 
Leave a bit at the base for a handle. 

Hold the very tip and pull back the fibers

Tie in the tip of hackle on your side with the front of the hackle facing you. 

Wrap the hackle. Touching turns. 

Tuck the stem back and wind back over it. Cut or break it away. 

Whip finish, varnish and the fly is complete.

Monday, June 30, 2014

A great little fly


The hackle wing rusty spinner is a staple in my box.  Tied large to small. Pictured is a size 20. The small sizes with a simple thread body have served me well on many streams.  From the tough limestones to tail waters and everywhere in between. 
 The hackle wing spinner is an old spinner pattern that is hands down one of the most effective and durable ways to tie a spinner.  Quick, easy and few materials make this fly a no brainer.  
  
I'll be instructing how to tie this pattern at our up coming ridge and valley tying night on July 1st at the Musconetcong water shed association blg in asbury nj.   @ 730pm.  Come on out and learn to tie this deadly fly.   Also Utah's fly corners next video in the works is for the #20 rusty hackle wing spinner.  So stay tuned. 

Johnny 


Friday, September 23, 2011

The mayfly cripple tutorial

This is a DEADLY pattern if you tie it correctly.  I will tie a bwo in this one. You can change the dubbing, thread, and hackle color to match the naturals. With hackle, I have found that you can go wrong with dun. No matter what natural your imitating. This is the standard mayfly cripple. I learned of this pattern through Mike Lawson.


Materials-
Hook- any dry fly hook, one size larger than the natural.
Thread- color to match the naturals.
rear body- brown/rust marabou, and pheasant tail.
Rib- copper wire. Medium for 12-14, small for 16-20 and ex small for 20-and up.
thorax- super fine dubbing, color to match the naturals
Hackle- Neck hackle dun or a color to match the naturals. You can use saddle but I prefer neck for this because its not as stiff as saddle, allowing the fly to really nestle down in the film.
Wing- Deer hair, natural or dyed dun.

Image
Hook in vise, start your thread and take it back to the barb.

Image
Tie in your marabou by the tip, and pheasant tail, sparse is good! Make a very short tail. Tie in the marabou first and then the pheasant. You can break the marabou to adjust its length. Bring thread forwards, stop a little past half. (WET YOUR BOU, IT WILL SAVE YOU MUCH AGGRAVATION  )

Image
Tie in wire, bind it down on top and back just past your bou and pheasant.

Image
Make a loop with the wire. Bind down the wire a quarter the way up. THIS STEP IS A MUST FOR THIS PATTERN TO SIT PROPERLY IN THE WATER. IF YOU DO THIS STEP YOUR FLY WILL LAND THE ON THE WATER RIGHT EVERY TIME. ;)

Image
Put your bou and pheasant in the middle of the loop on top. Take you twister and from right to left go, under the wire over the bou and pheasant and hook the wire on the other side(Left). This will ensure you catch and bind the material in between the wire.

Image
Twist it. Be sure you twist until the wire is spun right to the tie in points. Be careful not to go to much and break the wire.  You get a very nice "buggy" dubbing brush.

Image
wrap it up, until the point where you tied in the wire. Tie it off on top.

Image
Cut off your excess. I use wire nippers, I don't recommend using your scissors on the wire. You can also bend and break the wire and then simple cut the bou and pheasant, if they didn't break away with the wire. Then tidy up. advance down to the eye and back to the tie off point.

Image
Dub your thread nice and tight. Wrap over the tie in and forward a mil or two.

Image
Tie in your deer hair, This step is very similar to tying in a caddis wing. Tips forward of the eye. Keep the tips short going in front of the eye. Hold the deer hair on top and bind down towards the eye. Don't allow it to spin. Leave yourself a hook eye worth of shank behind the eye. Take two three wraps in this area for your anchor wraps, so your deer hair wont spin. Bring the thread back to the tie in point.

Image
Trim your deer hair butts. Leave about two to three mil of butts, this will help balance the fly and will simulate a wing case busting open.

Image
Tie in your hackle. I like to have the feather good side up. advance thread forward and stop at the the butts of the tips of the deer hair. Wrap your hackle. You only need TWO wraps, NO MORE. Tie off behind the deer hair tips, then lift the tips and bring your thread onto the hook shank and tie off. Whip it Good.

Image
The result. a deadly mayfly cripple.

Image
This is how the fly will land and ride. The hackle will hold it in the film, while the lower half (the nymph) rides just under the film. You will see the deer hair wing sticking out of the water.

Tie these guys up, Fish'em, you wont be sorry.

Tight Ties everybody.
Johnny U.

Thursday, September 22, 2011

Magic tool, Creativity, and some new flies.

I have owned a MP magic tool for what seems like forever. I never really used it. Its a very simple tool set that like all MP tools seems over priced. Its certainly worth the investment. I like it for making simple hackle collars.
I sat down a decided I would design some soft hackle flies. I love to use cdc for soft hackles. It is my favorite next to partridge. So with the magic tool and some cdc I got started.................

The batch

The Atomic caddis

F3

F3

F7

G4

Sealy Rocko Wormy


 Now its just a matter of testing how effective they truly are...............I'll find out.


Monday, September 19, 2011

How to make custom dubbing blends.

Hello fellow tiers!!!!

Making dubbin can be fun. It is a great way to make blends of your liking. If you have ever seen a real insect than you know that they are not a consistent color. It doesn't take much, just a simple electric coffee grinder will do the trick. Furs from any animal. Yarn of just about any kind. Even marabou (AWESOME DUBBING)

For furs my personal favorites are rabbit, both mask and body hair. Body under fur is one of the softest and easiest dubbin around. When treated with a water proofing agent ie floatant it will float all day. Body fur with guard hairs makes awesome nymph dubbing that is extremely easy to dub. Squirrel of any variety. Squirrel makes great spiky nymph dubbing. Australian opossum is great nymph dubbing. Seals fur is great emerger dubbing. Which really goes well in dubbing blends. Muskrat is great nymph dubbing and also dry fly dubbing. Beaver makes great dry fly dubbing as well. 

Yarn of just about any sort. Check out whats on sale at the craft store or mega stores and pic out some colors you like.Its very easy to make yarn into dubbing. You can get wools and synthetics. Synthetics in the craft world they are acrylics.

Marabou from feathers and actual marabou makes some awesome dubbing. When you pluck those hackles don't just throw away that butt or strip it away. Instead cut it away. Store them in a bag or container and when you have accumulated a bunch simple trim the marabou from the stalk. DON'T strip it or you will up with the stems skin, which will not blend or dub so well.

Flash materials can be picked up via yarn or just picking up some packets of ice dub, polar dub, sts, antron and so on. My favorites are ice dub u.v., polar dub, and sts. The bags you get will make tons of blends. So they are well worth the couple of bucks.

General materials list.
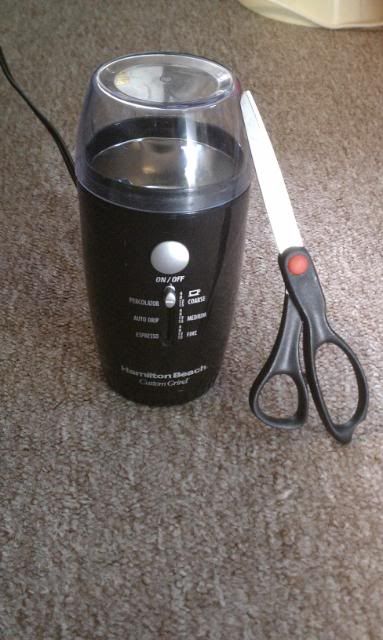
1- Electric coffee grinder. Wally world has a great one and its cheap.
2- Scissors.
3- Fur, yarn, Marabou, Flash materials.
4- dryer sheet or static guard- this is to help with static cling, not necessary but very helpful.
Tools. The coffee grinder is a wally world one, works excellently. I like the large scissors as you can get more with just a cut


Ok lets do a blend! This is one my favorites, its a great olive blend for caddis and various nymphs
Image
Materials-caddis green polar dubbing, an olive hare's mask, and caddis green sts

Image
Cut a small amount off the hares mask. If you want extra coarse dubbing cut in some ear hairs.
Image
load it into your grinder, and give it a few pulses of about the count of 1,2 and stop. Repeat. It will then look just like dubbing in a bag, but fluffier. This will help us add the flash materials. The grinder will chop up your fur if you let it run to long.
Image
Take out about 3-4 pinches of flash, about this much will do nicely. Add them to your hair that you have blended. Just dump the sts right in. Its a short cut dubbing so it will come apart and blend easily. The polar dubbing is a long cut dubbing. You will need to tease it out and put it in. Once you have them all in, give it several pulses of 1 and 2 and stop. Any time you use synthetic in your blender never blend to long or will end up with little plastic balls.

Image
The result. A buggy, flashy but not to flashy, easy to dub blend :D
As you can see it is quite simple. Have fun creating your own custom blends.

Tight Ties
Johnny Utah

Tuesday, September 13, 2011

Wild trout steam report 9/13/11

Well after getting some fly orders tied and in the mail. I met up again with Mr. George from Wild Fly 365. We hit my local spring creek for some wild brown action. The creek is still flowing high, but the water is clear once again. We nymphed, and worked are way up stream. We fished about 1/10th of mile of the stream.  We got into browns rather quickly. Mr. George was using a Golden Oldie and his hybrid hares ear. I was using the Golden Oldie followed by an improved zuggy. I love zug buggin. Hands down the oldie was the winner. The zug got a few.

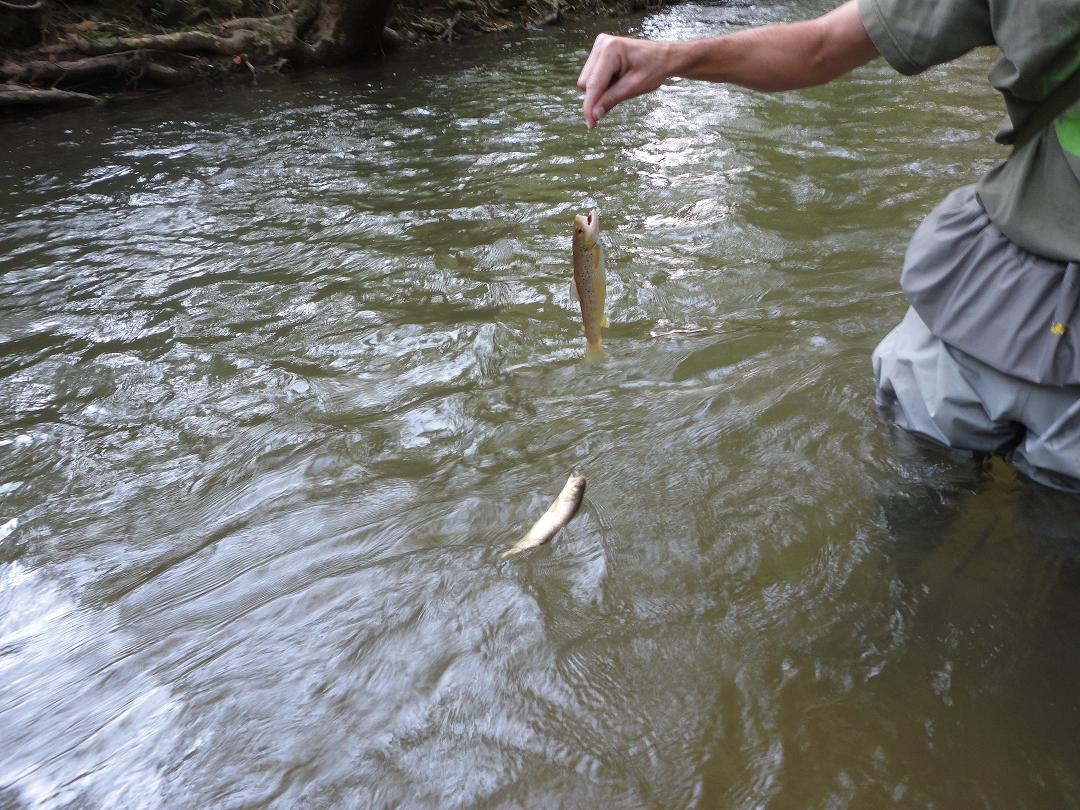
I got two wild browns on at the same time. One on the oldie and the other on the zug.  Needless to say I was rather surprised as I haven't done this with wild trout before, stockies a couple of time, but not wild.  Mr. George got a picture of it.

Several of the trout we caught came on the lift.  We noticed some mayflies hatching sporadically. There wasn't enough to get the fish up, but it would seem they were keyed in on the emerging bugs because the lift worked well.  With "more than four" and stomachs complaining, we headed back to the vehicles and off to Charlies Pool Room for the best hot dogs in existence!

Friday, September 9, 2011

The Top Secret Midge and Blue Quill Angler


The top secret midge is a midge pupa pattern that was developed by guide Pat Dorsey of the Blue Quill Angler in Evergreen Colorado. I love to fish this pattern on the lime in PA. When it's tied very small it cleans up.  I fish the pattern tandem on nymph rigs, as a dropper on dry drop rigs, and I fish it solo on a greased leader. I havent found a way that it isnt effective.

The Blue quill angler is great shop out in Colorado. They have a fantastic staff and unbeatable customer service. They have a great online fly shop  HERE. They offer free shipping on order over $5. Yes that is correct.  They have fair and competitive prices and good selection of materials.  You can pick up wing material for the top secret HERE, or you pick up some all ready twisted top secrets HERE.                                                                The above top secret twisted by Dorsey.


Heres a pair I twisted up. Ones got rusty brown superfine for the thorax region and the one to the left here has dark brown stella dub. I use grey thread for the rib instead of white.  Use white if you want a very translucent rib. The white pretty much vanishes.  One both I used dark brown uni thread, top secret wing material and Dai-Riki 125 hooks.  All the materials are availble at the blue quill angler fly shop.


 Heres a video on how to tie Dorsey's Miracle Nymph

Tight Ties 
Johnny Utah

Monday, September 5, 2011

Floating nymph 2

The pheasant tail nymph is a deadly nymph for sure, but an equal to the famous pheasant tail, is the Gold ribbed hares ear nymph. The hares ear  also makes a great floating nymph. Its very productive and can be effective in a range of sizes from 12-22 and im sure it would work well if you can manage to tie it smaller as well.  In this video I twist one up with a hi-vis post of hot pink parapost. The dubbin I use is my  U.V. High Test. I have been using this dubbin for this pattern for some time now and it does seem to give it an edge over your average parachute hares ear.  All parachute flies no matter the pattern are emerger flies. And we all know how effective emergers are thanks to Carl Richards and Doug Swisher.  Twist these guys up and give them a try.


Saturday, September 3, 2011

A Throw back and a lesson remembered

I did a video of an old pattern. One that has caught myself and so many others so many trout. I did the old school ant, but of coarse I used synthetic dubbin. I tied up a batch of Cinnamon ants, because I am going to fish a spot on a spring creek that I know the trout there get a regular diet of cinnamon colored ants.

Ants of this color are always small, well at least were I am from. They usually are between a 22- 26. I tie them in size 28 as well. If the trout are being picky, the smaller sizes are required.  In the video I tied a Huge one so the video would be clearer. I also tie these tiny ants in dark brown. This color represents the common ants that you see all the time. Yup they to fall in the water and become pray to the trout. The browns I tie in the same sizes.

I need to fire up the dye bath, to dye some tiny hackles red. There is an ant, one I have only ever seen on two streams. One in New Jersey and the other in P.A.. The body on these ants is the same color as trico, a super deep brown, pretty much black. The kooky thing about them is they have bright red legs. Weird looking they are for sure. But the trout are aware of them and they do look for them. I discovered these ants one July morning some years ago. I was fish the trico hatch and there was a rather large trout sipping occasionally. He was my last trout catch, I got the others, and put the rest down from catching them. I drifted my trico over that trout several times without even a look. I swapped patterns, going through my trico arsenal, and nothing.

I stood and watched the trout feeding. The rises were not in any kind of timing, but they were sipping rises just like the trout was taking spinners.  I got my binoculars out of my car and peered at the film, I could see trico spinners, drifting right over the trout.  I noticed a smiggin a extremely small bug on the water, smaller than the tricos. The trout came right up and took it. I thought hmm perhaps it was a midge or maybe an ant. I tried a griffiths gnat #26, the trout looked but no take. He didnt look again. I swapped out for the old timely cinnamon ant. I tied the size 26 ant on the line and cast it over him, it came into his window and he came right and sipped it right in, or so it appeared. Once I got the trout in, I saw he was fowl hooked. By chance i managed to hook him on the top of his head. Hey you try and keep track of a size 26 ant 15ft away. lol

 Once he settled and I removed the hook from his head, I pumped his throat. I had to see what he was eating. To my surprise, I pumped out a mess of the dark, red legged ants, and just a couple of small cinnamon.  I have a huge arachnophobia, I mean I will scream like a little girl when a big spiders on me. When i pumped the throat load on my hand, I could of swore those little ants were spiders. I nearly threw it right in the stream.  Upon closer inspection i noticed only six legs, but they were red.  I went home and picked a mess of hackles off the white neck i had and dyed them red.

Two weeks later later I returned to this stretch of stream with my hatch matching ants. I thought well they should work.  I had tied a couple up parachute style and a couple the old way. I tried the parachutes first. Not even a look. Hmmm. I put a trico on and started catching fish.  I got down near the area where I had the run in with that selective trout. A couple of trout were rising under the large sycamore. I watched the fish for a short while. I noticed one rising that was certainly larger then the rest. I set my trico a drift to him. He refused it. I tied on the old school red legged ant. Sent it a drift, and nose up, dorsal, tail, he was one. A great fight with a 17" wild brown. After I released him, I made my way back up to the fish that refused he parachute. There were some which didnt want my trico, and I wondered if they would take the ant.  I got every one of them with it, one the first drift to them. From that day on, I always carry red legged ant, tied the traditional way.

Heres a video of the traditional fur body ant. As I said earlier, its a large cinnamon. I tie the red legged ants to small for video. And I dont have a pic because as I stated earlier, I need to fire up the dye bath and dye some size 26 hackle red.

Wednesday, August 31, 2011

The Miracle Nymph


 The miracle nymph is a midge pattern which Ed Engle describes as "A  famous south Platte midge pattern."  It was created back in the early 70s by Ed Marsh. He also created the buckskin.  The miracle can be fished any way imaginable and is deadly on sipping, midging trout.  In both still and moving water. This pattern works well all over the country. Brooks, Browns, and Rainbows, all fall for the miracle.  I commonly use it as a dropper on my rigs when I fish midge dominated waters such as limestone streams.


The pattern utilizes floss to give depth to the body.  The white floss get wet and the thread under body bleeds through.  Giving the fly a nice translucent body. The floss is protected by a rib of copper or gold wire. The head is just a simple black thread head.  Different color under bodies can be quite effective as well. Red, and yellow for example can extremely effective at times. The head should be black no matter the color of the body. A light wire hook is recommended for this pattern. I prefer emerger hooks, for the light wire and wider gap. Also the shanks are short, so you can tie a size 24 on a size 20
 This is what the miracle nymph looks like wet.

A dry Red miracle nymph
A wet red miracle nymph


The Great A.K. Best, well known for his quill body flies, tied the biot miracle nymph. He subs out the floss and wire for a white goose biot. The fly has great segmentation but the translucently takes longer to  work then with floss.  When the fly is wet like shown in the picture you can see the black under body, giving the fly a secondary rib effect.  Once the fly is thoroughly soaked is does have a really nice translucency.   The biot is strong and durable enough that it does not require a rib.  This fly is a fish catcher 100% wild brown trout approved


Here to left is a the biot miracle nymph wet.


Here is a pink biot miracle. 
And below is me tying the original Miracle nymph enjoy.
Tight Ties everybody.